Design Portfolio

This is an intensive, one year course that guides digital career focused students in skill, project and portfolio development. It is structured to encourage individual exploration of a variety of applications, artistic mediums, design styles, and the ever-changing technology trends. Techniques and applications taught are used in numerous professional careers including: engineering, architecture, industrial design, forensics, medical & scientific research, military simulations, graphic design, advertising, game design, and film production. This class will help guide students to become active independent learners and better prepare them for their future career. This course is ideal for artists, and students pursuing careers in architecture, engineering, industrial design, robotics, game design, and entertainment industries.LAB FEE: $40 is required for design supplies and materials. *Meets MYP Design requirements

Get Syllabus Here

[−]


Design Portfolio

*Meets MYP technology requirements
Smoky Hill High School

Teacher: Dan Cornell Room: 1-814 Email: dcornell2@cherrycreekschools.org

Course Prerequisites: 3D Design, *2D Design Recommended

Course Information: This course is very exciting, not only for the students, but also for me to teach. Design Portfolio is a class designed for digital career focused students to create digital focused projects for the student’s portfolio. This intensive one year course guides students to develop aesthetic, conceptual, technical and cultural knowledge of digital media, 2D/3D visualization, basic programming, and visual arts. It will also give them an opportunity to learn skills necessary for a professional digital media career, such as digital portfolio development, career research, professional community networking and skills to become independent learners. The class will be structured for students to progress at their own pace and ability, while expanding previous projects as well as creating new ones relevant to their career objectives within the four major strands: animation, 3D design, CAD, or programming. This class will help guide students to become active independent learners and better preparing them for their future career. The culminating event for the student is the creation of a digital portfolio, the senior showcase, and possibly the scholastic art show.

Each student is assessed a $40.00 fee which covers your sketch planning book and a small portion of the materials you will consume over the course of the year.

ATTENDANCE: Regular attendance is essential; classroom content is sequential and classes missed will affect student’s performance. Attendance is taken at the beginning of class; students need to be in their seat at the bell.

ABSENCES: Students will not be allowed admittance into class without a re-admit slip that indicates if the absence is excused or unexcused. Refer to the Parent/Student Handbook for questions related general school rules and policies as it will be followed in my class.

BE HONEST: Cheating on assignments will not be tolerated and will result in a zero and parents will be contacted. Asking and allowing another person to copy an assignment is cheating and both people are at fault. Again, see the Parent/Student Handbook for further information.

HOMEWORK: Homework will be given occasionally, majority of assignments need to be completed in class do to software and computer availability.


EXTRA HELP: Any time a student is in need of help, she/he can come and see me and we will arrange an appointment. We also have open studio every Tuesday from 2:30pm to 4:30pm.

MATERIALS: I highly recommend, NOT REQUIRED, that students purchase a thumb drive for portable storage and file back-up (minimum of 4 Gig). They are sold at any computer store and range from $6 - $10.

Students will be required to keep an ongoing portfolio of digital images as an archive as well as for documentation. These photos/images (ideally) will be taken as products are completed.


Grading

PRACTICE ASSIGNMENTS – 40%: These assignments will consist of guided skill lessons and projects. *Grades will be weighted based on classroom time allotted.

FINAL ASSIGNMENTS – 60%: These assignments will consist of coached projects and documentation. *Grades will be weighted based on classroom time allotted.

[−]


Industrial Design Portfolio 12 + projects
6 - 10 quality finalized product models
10+ finalized model sketches
3-5 original finalized concept model sheets
2-3 finalized model renders
1-2 physical 3d models / products


3D Modeler Portfolio 12 + projects
6-10 finalized non-tutorial models
10+ finalized model sketches
2-3 finalized concept model sheets
2-3 finalized model renders
1-3 original finished models


Digital Sculptor Portfolio 12 + projects
6-10 finalized non-tutorial models
10+ finalized character sketches
2-3 finalized concept model sheets
2-3 finalized traditional sculpture
2-3 finalized model renders
1-3 original finished models

[−]


Here

Tracing Photos to be Cut on the Laser Cutter

Capture1

Define you workspace size.  In this case we are using standard letter (8.5” X 11”) Also switch Color Mode to RGB.
Capture2

Open the image you want to cutout.  File > Open and navigate to the file.
Laser_CutOut1


Select the drop down menu next to the Image Trace button and choose Silhouettes.
Trace


It should look something like this.
Laser_CutOut2


Under the Tracing Result drop down menu.
outlines


It should look like this.  Evailuate the output, to make sure this is what you want to cutout. 
Laser_CutOut3

Now press the Expand button which converts the object intopaths.
Laser_CutOut4

Right-Click to an select ungroup.
Laser_CutOut5

With the lines still selected, change the Fill color to (None) and then {shift} + Left-Click the line color and change the RGB color to pure red 255, 0 , 0.
color
Laser_CutOut6

Using the Direct Select Tool, isolate the border edge and delete it.  I found it was easier to group it first and then delete the group, otherwise you have to delete all the individual lines independently.
DirectSelectTool

It should look like this . . .
Laser_CutOut7

Laser_CutOut8

Laser_CutOut9


*** I don’t know why yet, but this process seems to create a duplicate traced image.  Moved top traced image aside and delete everything else. ???

duplicate


Now scale it so that it fits the output paper.  I duplicated the final lizard and moved to be able to fit both on the paper.
Laser_CutOut10

The Droste effect

Pedals

3DTeacher-Icon2_thumb_thumb
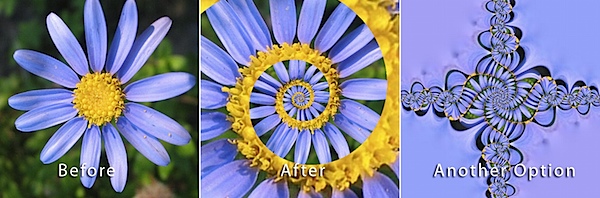
I have always been curious of the Droste effect but have never really investigated it until now.  It is very cool and  I think after playing with the tool, one can really get innovative in how it can be applied.   I tried it out with an image of a flower, as seen above, and it turned out really awesome!  Try it out and see what you can do and then take it to the next level showing me something I have not seen yet. 
The Droste effect is a recursive instancing where an image infinitely contains a smaller copy of itself; like the effect between two mirrors.   It is also know as "mise en abyme" in the art word.  Which can be seen in the triptych (a three panel painting) ‘Stefaneschi Triptych’ by Giotto di Bondone in 1320. The Cardinal offers the triptych of St. Peter to St. Peter with in the same painting.  
Droste[1]The Droste effect is more of a modern term coined from an image on he box of Droste Cocoa powder.   It also could be described as a ‘strange loop’ or a self-referencing instance, which is the cornerstone of fractal geometry.  Tools like Photoshop allow you great control of you instance an image with-in itself.  ~Cornell


I love this one . . .

MC Escher and the Droste Effect - Part 1


MC Escher and the Droste Effect - Part 2


Installation Notes
Basically, download Pixel Blender from here.
http://www.adobe.com/devnet/pixelbender.html
Of course I didn’t read through the instructions at first, it is easy, so I thought I installed everything wrong and attempted a few times.  Just remember it is not a filter in Photoshop, Pixel Blender is an independent app that works with Photoshop. 
The Droste Effect filter can found here:
http://www.subblue.com/assets/0000/2916/DrosteEffectFilter.zip

To install the Pixel Bender Toolkit in Windows:
  1. Download the Pixel Bender Toolkit ZIP file.
  2. Unzip the package, navigate to the unzipped location, and run Setup.exe. The Pixel Bender Toolkit files are installed into your Program Files folder under Program Files\Adobe\Adobe Utilities - CS5\Pixel Bender Toolkit 2.
  3. Launch the Adobe Pixel Bender Toolkit IDE from the Start > All Programs menu.
  4. Load a Pixel Bender file into the IDE by choosing the File > Open Filter menu or by pressing Ctrl+O.
  5. To try the filter, click on the Run button on the bottom right corner, underneath the code editor window.
  6. If the filter requires an image for processing, you will be prompted to open an image file. If the filter has parameters, you will see editing controls in the panel on the right edge of the application.
To install the Pixel Bender Toolkit in Mac OS:
  1. Download the Pixel Bender Toolkit DMG file.
  2. Double-click on the DMG item to mount the installer virtual disk.
  3. In that virtual disk, double-click to launch the Setup application. The Pixel Bender Toolkit files are installed into your Applications folder under /Applications/Utilities/Adobe Utilities - CS5\Pixel Bender Toolkit 2.
  4. Launch the Pixel Bender Toolkit IDE from the Applications Folder: /Applications/Utilities/Adobe Utilities - CS5\Pixel Bender Toolkit 2.
  5. Load a Pixel Bender file into the IDE by choosing the File > Open Filter menu or by pressing Cmd+O.
  6. To try the filter, click on the Run button on the bottom right corner underneath the code editor window.
  7. If the filter requires an image for processing, you will be prompted to open an image file. If the filter has parameters, you will see editing controls in the panel on the right edge of the application.
Droste Effect Filter:
Copy the “Droste.pbk” file and paste it in the Pixel Bender Files Folder (Program Files (x86) > Adobe > Adobe Utilities – CS5 > Pixel Bender Toolkit 2 > Pixel bender files)

These are the steps you should follow for best results:
  1. Create a source image that is square in ratio, is centered, has some type of frame, and then remove the background.  Save image as a PNG file type which allows for a transparent background.
  2. In Pixel Blender:
    1. Check the box next to transparentInside.
    2. Adjusting the centerShift parameter will adjust the center of your spiral, but if your image was already centered, it should workout well for an initial image.  There are settings for both X & Y direction.
    3. Adjusting the center parameter will allow you to frame the overall image in both X & Y direction.
    4. Also make sure you try out adjusting the fractalPoints . . .
    5. For the most part, just play with the settings and have fun.
This was playing with all the settings . . .
Pedals3

Below is a video tutorial of how to install the plugin to Photoshop.  Very Cool!

Here is a great tutorial on how to adjust the tool settings. 

The Digital Selfie

taylor[1]

Create a series of five digital versions of yourself using the digital software like Photoshop.  While making these portraits, consider:

        How do you see yourself, your identity, or people in general
        How do you see yourself in connection to digital technology, society, your family / friends, etc.?

Your portraits can be literal renditions of yourself, abstract representations, or representational but not literal. In other words, render yourself in a way that you feel shows your essence.

BLOG Entry #1:

Before you do anything, brainstorm your initial thoughts.  This is a very important step because you might have original ideas that have not even been thought of yet. If you research first, your ideas my be just rehashes of other peoples ideas.  You have original ideas, find them!  Scan or photograph your brainstorm session.


RULES:

  • You may not use images found on the web for this assignment.
  • NO! "Scrapbook" / "Yearbook" type collages
  • Filters must be used PURPOSEFULLY... with intent, either conceptual or visual. NO GRATUITOUS FILTER ABUSE!

Research & BLOG Entry #2:

Use the library, the SIGGRAPH exhibition catalogs, our program’s examples, and the web to look up examples of:

  • Self portraits (in any medium)
  • Digital paintings
  • Digital imaging and collage

Choose three NEW artists/artworks you like, and in your BLOG:

  1. Upload images or link to their URLs;
  2. Write a paragraph that discusses the FORMAL elements of the work (composition, color, etc.);
  3. Write a paragraph that addresses how Identity is addressed in that piece

 Examples of diverse artists and artworks: 


Archimboldo

Frank Auerbach
Matthew Barney
Nancy Burson
Bruce Bennett
Chuck Close
David Ho
William DeKooning
Marlena Dietrich
John Trevin

Frida Kahlo
Paul Klee
Lleana Frometa Grillio

Victoria Vesna
Edwaurdo Kac
Lucien Freud
Tina LaPorta
Shu Lea Cheang
Robert Longo

Martina Lopez
Alice Neel
Georgia O'Keefe
Negar Nahidian
Orlan
Robert Corwin
Cindy Sherman
Stelarc
Wendy Morris
Student Examples


Research & BLOG Entry #3:
Source Photographs:

Take a minimum 24 shots of yourself, portraits.  Photos can be anything from parts or close-ups to whole portrait. Choose the six most important shots to show to your peers in class. Be prepared to contextualize them in comparison to your artist research. In addition to the 24 new shots, you may also use earlier photos (family, child pictures, etc.) You can also use props, photographed together or independently. If you use a point-and-shoot, make sure it is 5 megapixel or higher.  

Post all images in your blog.


    * NOTE: You may not use INTERNET images for this assignment. If you do, you will receive a ZERO for the project!! **


Final Images:

     *** Make sure you turn in a versions that are at least 150dpi, 8-12 inches by 8-12 inches, flattened TIF format.  Why TIF?