
The Droste effect


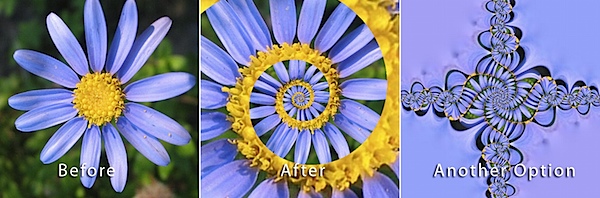
I have always been curious of the Droste effect but have never really investigated it until now. It is very cool and I think after playing with the tool, one can really get innovative in how it can be applied. I tried it out with an image of a flower, as seen above, and it turned out really awesome! Try it out and see what you can do and then take it to the next level showing me something I have not seen yet. 
The Droste effect is a recursive instancing where an image infinitely contains a smaller copy of itself; like the effect between two mirrors. It is also know as "mise en abyme" in the art word. Which can be seen in the triptych (a three panel painting) ‘Stefaneschi Triptych’ by Giotto di Bondone in 1320. The Cardinal offers the triptych of St. Peter to St. Peter with in the same painting.
![Droste[1]](https://blogger.googleusercontent.com/img/b/R29vZ2xl/AVvXsEg7AgeL5kfUgqtkA1UNXZ4scuHQsWbd2frGIO_FDcmpdjYvQMpZrtABL4yU4_Z7wPz7h4zGZj5cod5I2eqcxrVLqLxpwLBanztIRtSuj2Kzn9TE7hiYJ8gjWMvKrdTVSP030gOIxOuq4KEQ/?imgmax=800 "Droste[1]") The Droste effect is more of a modern term coined from an image on he box of Droste Cocoa powder. It also could be described as a ‘strange loop’ or a self-referencing instance, which is the cornerstone of fractal geometry. Tools like Photoshop allow you great control of you instance an image with-in itself. ~Cornell
The Droste effect is more of a modern term coined from an image on he box of Droste Cocoa powder. It also could be described as a ‘strange loop’ or a self-referencing instance, which is the cornerstone of fractal geometry. Tools like Photoshop allow you great control of you instance an image with-in itself. ~Cornell
![Droste[1]](http://upload.wikimedia.org/wikipedia/commons/6/62/Droste.jpg "Droste[1]") The Droste effect is more of a modern term coined from an image on he box of Droste Cocoa powder. It also could be described as a ‘strange loop’ or a self-referencing instance, which is the cornerstone of fractal geometry. Tools like Photoshop allow you great control of you instance an image with-in itself. ~Cornell
The Droste effect is more of a modern term coined from an image on he box of Droste Cocoa powder. It also could be described as a ‘strange loop’ or a self-referencing instance, which is the cornerstone of fractal geometry. Tools like Photoshop allow you great control of you instance an image with-in itself. ~Cornell
I love this one . . .

MC Escher and the Droste Effect - Part 1
MC Escher and the Droste Effect - Part 2
Installation Notes
Basically, download Pixel Blender from here.
http://www.adobe.com/devnet/pixelbender.html
http://www.adobe.com/devnet/pixelbender.html
Of course I didn’t read through the instructions at first, it is easy, so I thought I installed everything wrong and attempted a few times. Just remember it is not a filter in Photoshop, Pixel Blender is an independent app that works with Photoshop.
The Droste Effect filter can found here:
http://www.subblue.com/assets/0000/2916/DrosteEffectFilter.zip
http://www.subblue.com/assets/0000/2916/DrosteEffectFilter.zip
- Download the Pixel Bender Toolkit ZIP file.
- Unzip the package, navigate to the unzipped location, and run Setup.exe. The Pixel Bender Toolkit files are installed into your Program Files folder under Program Files\Adobe\Adobe Utilities - CS5\Pixel Bender Toolkit 2.
- Launch the Adobe Pixel Bender Toolkit IDE from the Start > All Programs menu.
- Load a Pixel Bender file into the IDE by choosing the File > Open Filter menu or by pressing Ctrl+O.
- To try the filter, click on the Run button on the bottom right corner, underneath the code editor window.
- If the filter requires an image for processing, you will be prompted to open an image file. If the filter has parameters, you will see editing controls in the panel on the right edge of the application.
- Download the Pixel Bender Toolkit DMG file.
- Double-click on the DMG item to mount the installer virtual disk.
- In that virtual disk, double-click to launch the Setup application. The Pixel Bender Toolkit files are installed into your Applications folder under /Applications/Utilities/Adobe Utilities - CS5\Pixel Bender Toolkit 2.
- Launch the Pixel Bender Toolkit IDE from the Applications Folder: /Applications/Utilities/Adobe Utilities - CS5\Pixel Bender Toolkit 2.
- Load a Pixel Bender file into the IDE by choosing the File > Open Filter menu or by pressing Cmd+O.
- To try the filter, click on the Run button on the bottom right corner underneath the code editor window.
- If the filter requires an image for processing, you will be prompted to open an image file. If the filter has parameters, you will see editing controls in the panel on the right edge of the application.
Copy the “Droste.pbk” file and paste it in the Pixel Bender Files Folder (Program Files (x86) > Adobe > Adobe Utilities – CS5 > Pixel Bender Toolkit 2 > Pixel bender files)
These are the steps you should follow for best results:
- Create a source image that is square in ratio, is centered, has some type of frame, and then remove the background. Save image as a PNG file type which allows for a transparent background.
- In Pixel Blender:
- Check the box next to transparentInside.
- Adjusting the centerShift parameter will adjust the center of your spiral, but if your image was already centered, it should workout well for an initial image. There are settings for both X & Y direction.
- Adjusting the center parameter will allow you to frame the overall image in both X & Y direction.
- Also make sure you try out adjusting the fractalPoints . . .
- For the most part, just play with the settings and have fun.
This was playing with all the settings . . .

Below is a video tutorial of how to install the plugin to Photoshop. Very Cool!
Here is a great tutorial on how to adjust the tool settings.
![]()
0 Response to "The Droste effect"