LEARNING TARGETS:
» I understand » I understand the responsibilities and ethics associated with publishing to the internet
Using the transform, liquify filter and some shading, were going to effectively dress up a rhino in zebra fur.
Source Images
In this tutorial, we're going to combine two animals:
And should look something like this:
First and most important is to find the proper source images. I chose these 2 since the angles and stances are very similar.
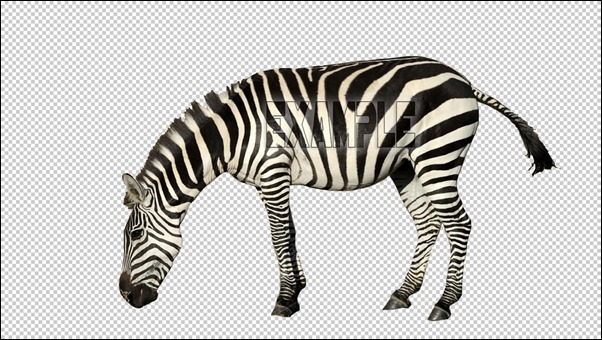
Since I liked the high contrast color of the zebra, I decided to use the actual fur and "mold" it over the rhino's body. So with that said, I extracted the zebra from its background and pasted it into the rhino file on a new layer.
NOTE: It's a good idea to use a hi-res image because when you're stretching pixels, a low resolution file is going to lose its realism.
*New Step: CUT OUT ZEBRA
Cut out the zebra and then paste it on top of the rhino image.
Also cut-out the Rhino.
Resize the zebra so that the body is close to the size of the rhino. Using the transform {CTRL} + {T} the zebra to best fit the zebra skin over the rhino. The closer you get to the rhino’s size the easier it is later.
Now use the Warp Tool to get even closer to the rhino’s shape. Edit > Transform > Warp
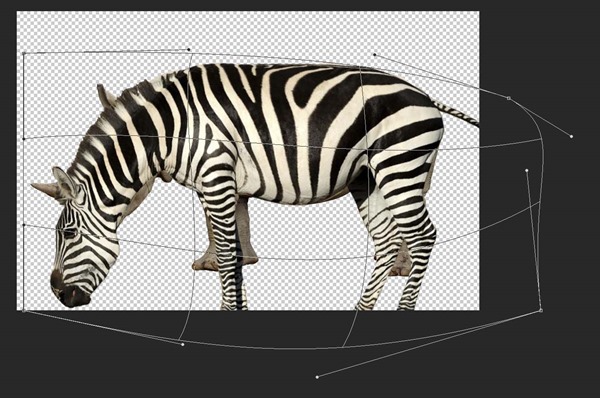
Make a back-up layer. Right-Click on the Body Layer and select Duplicate. Name is Body Backup, you will use it later.
Using the Lasso Tool, cut off the inner legs, the head, and tail. I cut off the head at an obvious zebra stripe.
Now use the Warp Tool again to get even closer to the rhino’s shape. Edit > Transform > Warp
Since my goal is to cover the rhino's body completely with the zebra, it is best to use the liquefy tool next.
The layers can be a bit tricky. First make sure your layers are labeled, rhino & zebra. Select the layer you want to liquefy and choose Filters > Liquify First we want to make sure it is set up right, in the lower right hand corner, go to View Options
Change the following:
Use: Rhino
Mode: Behind
Opacity: Adjust to your preference
It is important to become familiar with this, because it tis tricky.
I start with a large brush and as I progress make my brush smaller for the details.
You need to have quite a bit of patience with the Liquify filter to get the best results. I'm going to assume that you have some experience with this filter so I'm going to get to the point.
Press and Hold the {Ctrl} key and click on on the thumbnail of the rhino layer.
The perimeter of the rhino is now selected. The marching ants with show the perimeter of the rhino.
We want to select the outer area, or the inverse of the rhino. Select > Inverse or {Ctrl} + {Shift} + {i}. *Now make sure the zebra body layer is selected.
With the Marquee Tool select the front back leg.
Make sure you are on the zebra body layer and press {Delete} on the computer.
From your original zebra layer, select, copy {Ctrl} + {c}, and paste {Ctrl} + {v} the zebra head. *When you paste something in Photoshop, it creates a new layer.
Use the Move Tool to position the head. {v} on the keyboard activates the Move Tool.
Position it, something like this. Use the Move Tool to position the head copy over the the front rhino head, {v} on the keyboard activates the Move Tool.
Select the ears and mane and delete them.
Like this . . .
Now using the Warp Tool, adjust it so that the shape is even closer. Edit > Transform > Warp
You may need to Liquifey the head a bit more.
Select and cut off the excess neck from the Zebra head.
Like this . . .
Select the Head Layer and change the Blend Mode to Overlay for the skin to blend in with the rhino skin.
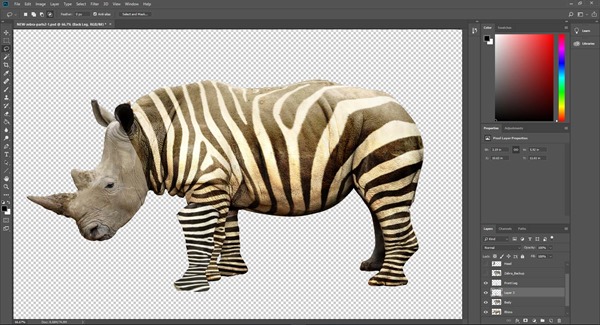
Select the back leg.
From your zebra body layer, select, copy {Ctrl} + {c}, and paste {Ctrl} + {v} the back leg. *When you paste something in Photoshop, it creates a new layer, rename the layer to “Front Leg”.
Use the Move Tool to position the new leg layer over the the front unskinned leg, {v} on the keyboard activates the Move Tool. Now using the Free Transform Tool, resize the leg so that it covers the front hidden leg of the rhino. Press {CTRL} + {T} with the zebra front leg layer selected and resize it so that it covers the front hidden leg.
Press and Hold the {Ctrl} key and click on on the thumbnail of the “rhino” layer. The perimeter of the rhino is now selected. The marching ants with show the perimeter of the rhino. We want to select the outer area, or the inverse of the rhino. Select > Inverse or {Ctrl} + {Shift} + {i}. *Now make sure the zebra “Front Leg” layer is selected. Press {Delete} on the keyboard. This should delete the extra zebra skin. It should look something like this.
Press and Hold the {Ctrl} key and click on on the thumbnail of the “Zebra Body” layer. The perimeter of the “Zebra Body” and the marching ants outline the perimeter. *Now make sure the zebra “Front Leg” layer is selected.
Press {Delete} on the keyboard. This should delete the extra zebra skin. It should look something like this.
Select the Head Layer and change the Blend Mode to Overlay for the skin to blend in with the rhino skin.
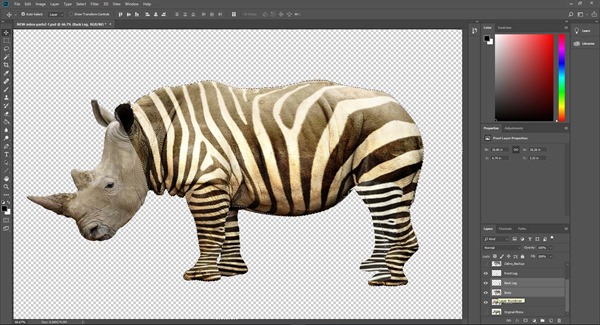
From your zebra body layer, select the front leg, copy {Ctrl} + {c}, and paste {Ctrl} + {v} to paste the copy leg. *When you paste something in Photoshop, it creates a new layer, rename the layer to “Back Leg”.
Use the Move Tool to position the new leg layer over the the front unskinned leg, {v} on the keyboard activates the Move Tool. Now using the Free Transform Tool, resize the leg so that it covers the front hidden leg of the rhino. Press {CTRL} + {T} with the zebra back leg layer selected and resize it so that it covers the front hidden leg.
Press and Hold the {Ctrl} key and click on on the thumbnail of the “rhino” layer. The perimeter of the rhino is now selected. The marching ants with show the perimeter of the rhino. We want to select the outer area, or the inverse of the rhino. Select > Inverse or {Ctrl} + {Shift} + {i}.
Now make sure the zebra “Back Leg” layer is selected. Press {Delete} on the keyboard. This should delete the extra zebra skin. It should look something like this.
Press and Hold the {Ctrl} key and click on on the thumbnail of the “Zebra Body” layer. The perimeter of the “Zebra Body” will be selected and outline with marching ants. *Now make sure the zebra “Front Leg” layer is selected.
Press {Delete} on the keyboard. This should delete the extra zebra skin. It should look something like this.
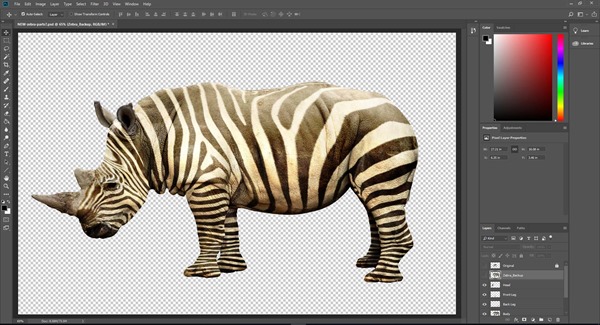
Select the Back Leg Layer and change the Blend Mode to Overlay for the skin to blend in with the rhino skin.
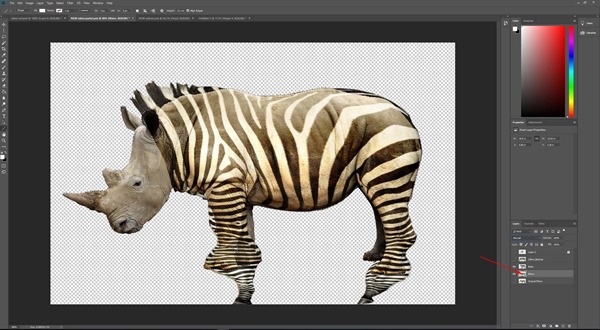
Show the head layer again; it should look something like this.
Now using the Eraser Tool, with the Opacity Set to 10% try to blend/feather the Zebra stipes in with the skin in a little better. Erase more around the feet, it looks more natural.
The Tail:
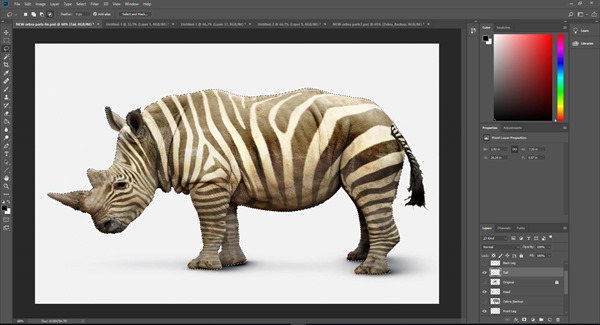
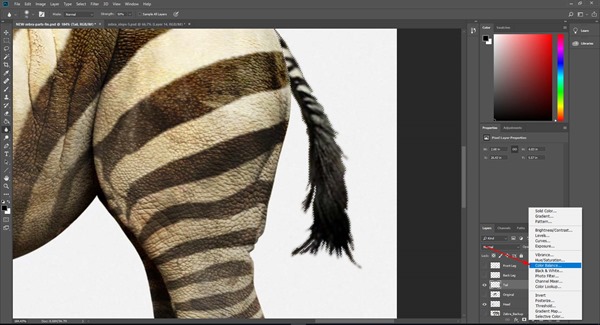
Select the tail from the original zebra cut-out, copy & past it, then move, scale, & rotate appropriately. {Ctrl} + t to activate the transform tool.
Something like this.
Press and Hold the {Ctrl} key and click on on the thumbnail of the “rhino” layer. The perimeter of the rhino is now selected and marching ants with show the perimeter of the rhino. Now make sure the zebra “Tail” layer is selected. Press {Delete} on the keyboard. This should delete the extra part of the tail. It should look something like this.
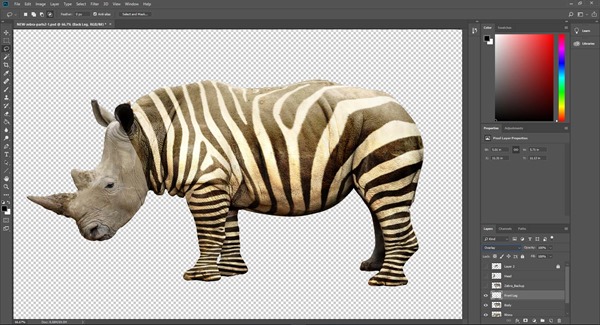
Finished


/rhinoGE1-58d2be145f9b584683b509a8.jpg)















0 Response to "TUTORIAL: Photoshop - Zebraceros"